Have you ever used a bag of commercial potting soil? If so, you may have n... Read More
- Home >
- Dutch Bucket / Bato Bucket Hydroponic System
Dutch Bucket / Bato Bucket Hydroponic System
One of the main reasons I choose to go with Hydroponics is its control, flexibility and low-maintenance. You can be creative to set up one yourself and let it run for months with just some maintenance and checking. And best of all, we can build an easy home-made food production system for our family.
For simple DIY home-made systems, you can go with the Kratky method, but it is not built for larger gardens and is not suitable for bushy, fruiting plants.
There is another type that is really easy to build, able to scale big, and can fit a great number of plants.
It is called The Dutch Bucket
Let’s dig into this growing technique.
What is the Dutch Bucket?
Dutch Bucket or Bato Bucket systems, as the name sounds, use the buckets as the core of this growing method. The system can have just one bucket or scale to any size growers want. That’s the joy of an easy yet still versatile Hydroponic method.
Dutch Bucket is a variation of the Ebb and flow (or Flood and Drain) method. It differs in the way it looks, but still, operates on the same principle – the nutrient is forced onto the bucket (that replaces the tray) then automatically drain back to the reservoir (or it can drain out of the system without returning to the reservoir) at regular intervals.
It can be used as a Hydroponic system, and also works great for aquaponics as well even though it is harder to set up.
How does the Dutch Bucket work?
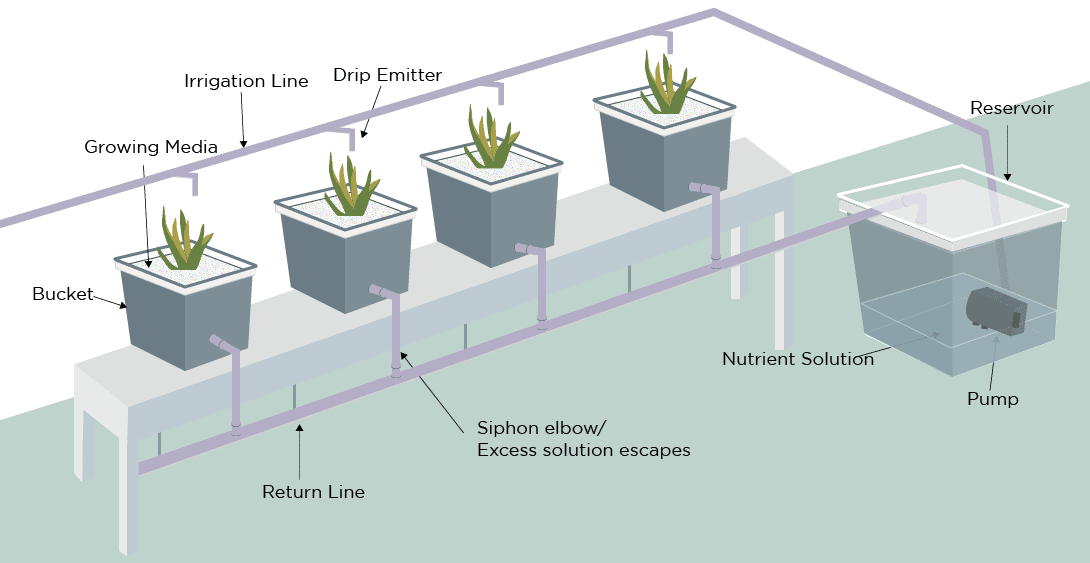
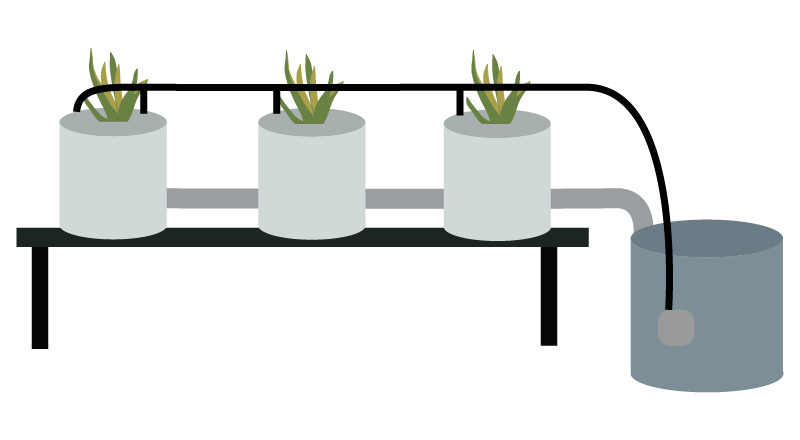
First, you would notice that there are several buckets on the bench. Each bucket should only accommodate one plant.
These buckets must contain growing media (perlite, vermiculite, etc) to keep the moisture, aeration as well as supporting plants to stand upright.
There is one large bucket/reservoir that holds water and nutrients.
A submersible pump is placed into this reservoir to pump the nutrients onto the drip/irrigation line and drop onto the plants via the drip emitters.
The drip emitters are fixed to the irrigation line and are pointed to each bucket to feed the plants.
You will also see the bucket elbow at each bucket. It functions to drain the excess nutrient solutions to the return line and then come back to the reservoir.
As a result, and nutrient solutions are not lost during the watering, and feeding process, making this method an effective recirculation technique.
You can turn on the pump and the let it run 24 hours a day without stopping and regular checking. This is because the when the pump gets the nutrients and water onto the irrigation line, buckets, gravity will drain it back to where it begins.
If you don’t want the nutrients to return to the reservoir, you can get it drain out of the system. This is called flow-to-waste. While it is wasteful, it does help solve the problem of nutrient unbalancing. As over time, plants will take up some major nutrients, creating an unbalance of nutrients in the system. Nutrient unbalancing is not good for plants’ optimal growth.
With proper set-up for the amounts of nutrient solution from the drippers, growers can let the system run continuously without worrying about drying out and suffocating plants.
But you’ll need to check and change the nutrients of your reservoir at various intervals. The frequency of mixing, diluting the nutrients in the reservoir is dependent on the plants/bucket numbers and the reservoir size.
A digital timer, which is connected to the pump, can be used if you want set intervals for the flooding circle.
Choosing the Growing media
When growing large or vining plants in the Dutch Bucket, choosing an appropriate media should be thought out seriously first.
You want a great growing material that is able to hold water but does not contain much moisture and are able to aerate well enough for the roots to respire. Plant support is also essential as well.
That’s why here are the suggested media for the Dutch Bucket: perlite, vermiculite, hydroton, coconut.
These all have a good air to water holding capacity and are environmental-friendly and sustainable as well.
You can use each of these materials alone or can mix with other media in different ratios.
Which Plants to grow?
Because of the way it is built, you can grow a variety of plants with the Dutch Bucket. It also allows growers to grow large, vining, fruiting crops or any plant that require a high amount of nutrients.
So with the Dutch bucket, you can grow cucumbers, peppers, potatoes, squash, and pole beans. But as I see, tomatoes are the most commonly grown in this kind of system. As tomatoes are vining plants that take up large of spaces and require support, the Dutch Bucket is very suited.
For larger plants, or plants that need plenty of nutrients, set up two drippers, or make the drip large enough for these plants.
And one caution when working with these large or vine plants that you should tie up and support for their proper position and growth.
Here is a visual video to explain the method.
Tools Needed
For an ease of explaining, let’s divide the system into 3 parts: Bato bucket, Irrigation Line, Return Line
Bato bucket
- Buckets. Should be one plant, one bucket. So decide the size of your systems with how many buckets you want.
- Lids. One lid for each bucket to cover the system.
- Growing media (perlite, hydroton, vermiculite, etc)
- Floor or bench
Irrigation Line
- Reservoir/tank
- Submersible pump
- PVC pipe. Its length depends on the size of your system.
- Drip emitters. Normally one bucket needs 1 dripper. But if plants require more amounts of nutrients, you can increase 2 drippers for 1 bucket.
- Fittings & connections.
Return Line
- Siphon Elbows. Each bucket should have one siphon elbows
- PVC pipe. Choose the size that fits your system.
The design can vary in reality based on your purpose, and liking but these are the basic stuff you need to start with the dutch bucket.
Pros and Cons
Pros:
- Great for fruiting plants, bushy, and vining plants like peppers, tomatoes, cucumbers.
- Space saving, especially for high vining and large crops.
- Flexible in size and setup. Can scale to any size growers want
- Convenient for pest management in case it occurs in one bucket because each bucket can be replaced easily without affecting the whole system.
- Recirculation system. All the drained water and nutrients are not lost but return to the reservoir if you set up the dutch bucket with the return line.
- Great hydroponic technique for beginners. It is easy to set up. And unlike other simple hydroponic systems like the Kratky, wicking, where you should only grow green vegs, the Dutch Bucket allows starters to grow harder plants like tomatoes, peppers and enjoy great results.
Cons:
- It needs your care to get maximum potential. Even though you spend little time with the system, to let plants thrive with this system, it’s better that you spend some time checking, and maintaining the system. You will also need to adjust or change the nutrient in the reservoir often.
- More spread of the disease when bad things happen in the reservoir. Because there is only 1 reservoir with many buckets on one feeding line, in case of pests/diseases occur in the tank, it can infect the whole system.
- Needs some knowledge and experiences to get the best of it. Although it’s easy to set up, you must need proper knowledge of all things related to get the best results. These include growing media used, amounts of nutrients dripped onto the plants, the feeding timing, plant support, etc.
Wrapping up
The Dutch Bucket is, by all means, an effective yet easy to set-up for any indoor and outdoor hydroponic growers. If you want to have a great hydroponic system that can scale big to provide lots of home-made foods, and can grow many types of plants, the Dutch Bucket is an excellent option.
Related Content
-
What is Perlite? What is its use in the garden?
-
Coconut Coir – What It Is, Varieties, and How to Use It
The growing medium meets soil additive, coconut coir (or coco coir for sho... Read More
-
The Best Grow Tents of 2025
If you don’t have a permanent structure for your garden or you want total ... Read More
-
Kind LED Grow Light Review – Are These LEDs Worth It?
When you’ve worked hard developing a hydroponic business to the point of b... Read More
